

Hope everyone is enjoying the weekend! I have another useful Sunday School for you this week and a little July 4th gift so keep reading! Today I am going to teach you how to make your own alpha. I use this alot; sometimes kits don't include an alpha or they just include one and you might want to title with two different alphas. It is so quick and easy to do. My tutorial is for Photoshop but I think it will be similar for Photoshop Elements too.
_______________________________
1 - Select the font style that you want to use and type your title out on your page keeping each letter on a separate layer. I am using 'You Are Loved' by Kimberly Geswein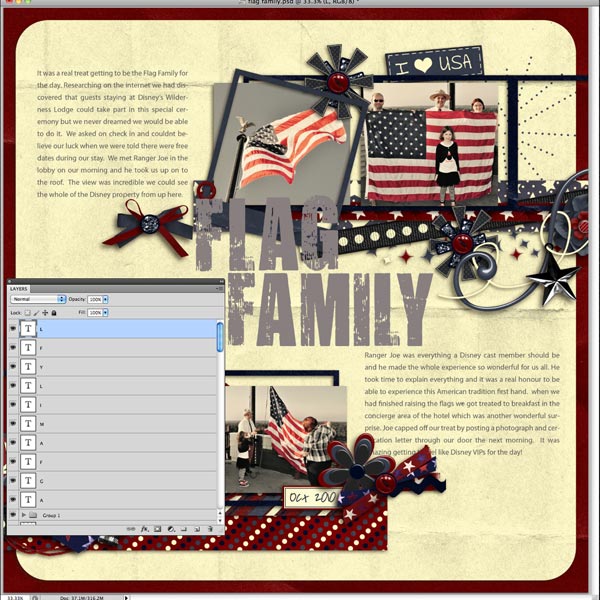
2. Open the paper or image that you want to fill your font with. I am using a royalty free image of a worn flag.

3. Drag the paper/ image onto your layout on to your layout on top of the letter layer that you want to fill. We are going to clip the paper to the letter layer in the same way that we did in my How To Use A Layered Template Tutorial

4. Clip paper to every letter in your title, you could use a selection of papers to make it interesting.

5. Once each letter is filled merge the layers. To do this highlight all the font layers with their clipped paper layers and click on the drop down layer tab, you will see merge layers in the list click this.


Here is my finished layout. The kit I have used here is Americana the free with purchase collab by Jen C Desigsn and LuvEwe Designs over at Funky Playground.

Now to wish you all a Happy 4th July I made my alpha for you as a freebie. Click the image to download. Enjoy!


Great tutorial Emma. Thanks for the alpha freebie!
ReplyDeleteGreat freebie. Thank you so very much.
ReplyDeleteGreat tut Emma - I knew about clipping something to the font but not the other little extras that make it even better = thanks!!!
ReplyDeleteJust a quick note to let you know that a link to this post will be placed on CraftCrave today [04 Jul 01:00am GMT]. Thanks, Maria
ReplyDeleteThanks for the tutorial, Emma. and thanks for the alpha too!
ReplyDeleteThank you! I've been making alphas that way except for burning the edges. I will be trying that next time.
ReplyDeleteEmma, I LOVE this alpha, especially the worn look, and I grabbed it to use on a layout with Andrea's freebie flag template. Thanks so much!
ReplyDeleteEmma, what a great tutorial, especially learning how to burn. Thank you!
ReplyDelete