Showing posts with label freebie. Show all posts

Sunday, 14 August 2011

Schools Out Today!!

There's no school today!  Andrea is driving over to visit me with her daughter today!  I am so excited to have them over for a little girly break. I speak to Andrea online near enough every day so it will be so much fun to have my online bff here in person.  Anyway to celebrate Andrea has whipped up a freebie template for me to give you all.  Here it is.
So enjoy your break from school and I'll be back with more lessons next week.

Sunday, 31 July 2011

Sunday School: Creating Shaped Text

In todays Sunday School we are going to be learning how to use custom shapes as text frames in photoshop. Who says that journaling has to be written in neat little boxes? Today I will teach you how to get creative and add text shapes as an additional design element to your pages. There's even another little freebie at the end for you all!
How to Create shaped text
Note: I have created a document 3600x3600 to work on for this tutorial but you can just as easily do all these steps directly onto your layout.  There is no need to create a new document just for creating your text paths.
1. Select the custom shape tool.
2. Once you have selected Custom Shape Tool go to the drop down shape menu in the options bar along the top of the screen and choose the shape you wish to use for your text frame.  The best shapes have a wide spaces inside to write in, if they are too small and fiddly the text will be very difficult to read.
3. In the far left of the options bar is a row of three 'square' icons, these give you different options when creating shapes. In order to create a text frame we need to select the square with the pen tool in the middle. This is the 'path' option and will allow is to draw a shape which is essentially a frame and allow us to write inside it.
4. Now draw your shape on to your document. Holding down the shift key as you draw your shape will allow it to maintain its proportions and not get stretched out of shape.
5. Use Ctrl+T (pc) or Command+T (Mac) to bring up your free transform bounding box. You can now resize, rotate and move your text frame shape as you would any other shape. So play with it on your layout until you are ahppy with the position.
6. Once you are happy with the position of your text frame select the Type Tool from the Tools Menu and move the type cursor anywhere into the middle of your shape frame. You will see 2 dotted brackets appear either side of the cursor which indicates that we are about to type inside a text frame. You can now fill your shape with your journaling. Once you have finished typing remember to accept by selecting the tick (checkmark) on the far right of the options bar. Your text can now be treated the same as regular text; select the style, size, justification and colour that is right for your layout.
Now I promised you all a little freebie and here it is, 4 shaped texts for use in photoshop or photoshop elements. Enjoy adding these to your layouts. 
Don't forget to let me know what else you would like to see covered in Sunday School.

Have a happy Scrappy week!

Sunday, 24 July 2011

Sunday School: Creating Text Paths


Today for Sunday School I am going to carry on with our creative journaling topic and teach you how to make text paths in photoshop. I know that PSE users can not make these themselves so I have included a little freebie for you at the end of this post.


How to create a text path
Note: I have created a document 3600x3600 to work on for this tutorial but you can just as easily do all these steps directly onto your layout.  There is no need to create a new document just for creating your text paths.
1. Select the shape tool.
2. Choose the shape that you want your text path to be either a regular shape or if you want something a little more fancy go to your custom shape tool. Then draw your shape on your document. I have chosen a heart.
3. Right click on the shape in the layer window and select - Rasterize Layer.
4. Right click again and this time choose - Select Pixels. You will see the marching ants appear around the outline of your shape.
5. Now go to your Paths window and at the bottom click the - Make Work Path from Selection icon (see below)
6. The marching ants will disappear and a solid line will appear around your shape, it is hard to see but it will be there I promise! Now select your Text tool, put the cursor near the edge of your shape where you want to start writing. You will see the cursor change from just an I to an I with a ~ through it. 
7. Once you have clicked you will see a text layer appear in your layer window. You can now start typing and you will see that your words will follow the edge of your shape. You can treat this text as regular text, change the size, style, colour etc. 
8. You can now delete your shape layer and just your text path will remain.
Tip
You can use the shapes in Andrea's templates to create your own text paths. If you want to write around the edge of a photo or a paper mat just treat that part of the template as your shape. Make sure the photo mat for instance is selected in your layer window and then right click on that layer to Select Pixels and then continue as outlined in the tutorial above.

Now I promised you all a little freebie and here it is, 4 text paths for use in photoshop or photoshop elements. Enjoy adding these to your layouts. 
I will be back next week with another journalling tutorial and another freebie.  Don't forget to let me know here what other tutorials you would like to see covered.  
Also don't forget to link Kim up with your Little Green Frog Designs layouts here and you might see your page featured in our gallery standouts. There is also only 1 week left to enter Andrea's fantastic blog challenge enter for the chance to win a guest CT spot!!

Have a great week.

Sunday, 3 July 2011

Sunday School: How to make your own Alpha

Hope everyone is enjoying the weekend! I have another useful Sunday School for you this week and a little July 4th gift so keep reading! Today I am going to teach you how to make your own alpha.  I use this alot; sometimes kits don't include an alpha or they just include one and you might want to title with two different alphas.  It is so quick and easy to do. My tutorial is for Photoshop but I think it will be similar for Photoshop Elements too.
_______________________________
1 - Select the font style that you want to use and type your title out on your page keeping each letter on a separate layer. I am using 'You Are Loved' by Kimberly Geswein
2. Open the paper or image that you want to fill your font with. I am using a royalty free image of a worn flag.  
3. Drag the paper/ image onto your layout on to your layout on top of the letter layer that you want to fill. We are going to clip the paper to the letter layer in the same way that we did in my How To Use A Layered Template Tutorial
4. Clip paper to every letter in your title, you could use a selection of papers to make it interesting. 
 5. Once each letter is filled merge the layers. To do this highlight all the font layers with their clipped paper layers and click on the drop down layer tab, you will see merge layers in the list click this.
6. You could stop at this point but I like to use the burn tool to give the edge of my alpha more definition. To do this you need to get the marching ants to appear around your alpha layer. In the layer window click on the square image of your font layer whilst holding down Command (Mac) or Control (PC)
 7. Once you have the marching ants around your letters select the drop down layer menu again and choose inverse.
 8. You will now see marching ants around the whole of your page as well.
 9. Once again go back to the drop down layer menu and this time select modify - feather
 10. This will open the feather selection box, you need to set the feather radius this is personal taste so play around with what suits.  The higher the number the more of your letter you will burn.
 11. Now select the burn tool from your tool menu and paint all over your alpha. the more times you go over it the darker the edging will get. This is personal preference so again trial and error will work best here.
 12. Once you have finished go back to the drop down layer menu and click on Deselect to get rid of the marching ants. Now shadow your alpha as normal and you are finished.
Here is my finished layout. The kit I have used here is Americana the free with purchase collab by Jen C Desigsn and LuvEwe Designs over at Funky Playground.
Now to wish you all a Happy 4th July I made my alpha for you as a freebie. Click the image to download.  Enjoy!

Saturday, 2 July 2011

July Blog Challenge

Hi everyone. Are you ready for a challenge? Your challenge, this month, is to create a layout using this broken template. You can use all the pieces of the template or just a few of the pieces (but not more than is included); it's up to you. 
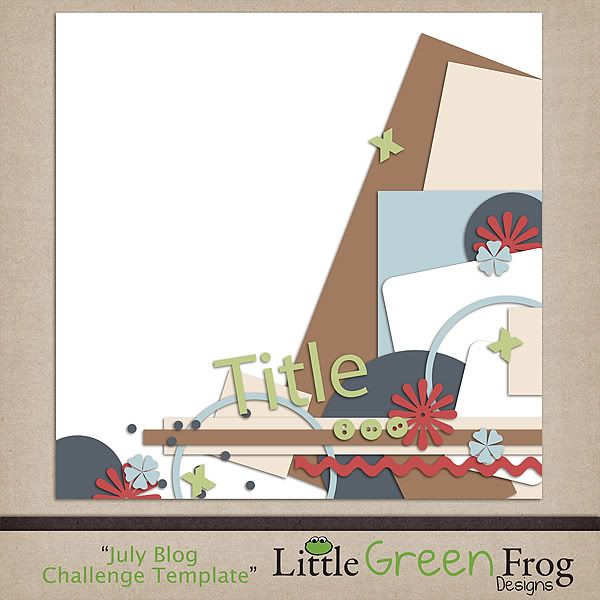
Need some inspiration for this challenge?

Here is a layout Kim created.
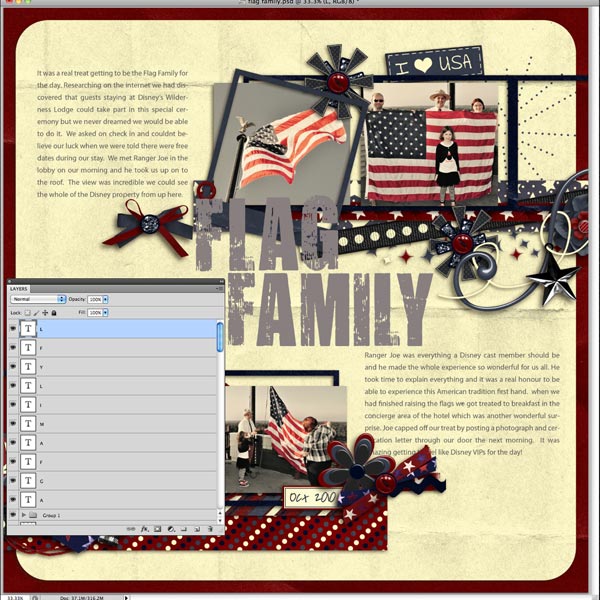
And here one I created.
Now on to the best part of this challenge. At the end of the month, I will randomly choose a winner and that person will win a guest spot on Andrea's CT for the month of August!! Just leave a link to your layout in the comments section of this post. I can't wait to see how creative you all can be.

Friday, 1 July 2011

7/1 New Releases and a special holiday freebie !!

Hi All
Hope you've all had a great week - here in the UK we've been blessed with some fab weather recently so it's been nice to make the most of it. 

Before I show you this week's new releases, I need to announce the winner of last week's RAK. Everyone who purchased from either of my stores between Friday 24th June and yesterday, were entered into a random drawing to win a coupon to the value of their shop purchase.

The winner is : Conny H. Congrats !! I will be sending your coupon to you via your store email address.

This week, I have another two template packs to show you. I really love how these turned out and from their pages, so did my CT !

The Bigger Picture

Here are some amazing pages from my CT :
Ashly
Cara
Emma
Cami
Tammy - Guest
Jordan
Debby
Didn't they do an awesome job ??? My second template pack is as a result of a request (no...make that a constant pecking in my ear from one of my CT...you know who you are :P) 

Doubled Over

And some more gorgeousness from my CT :

Kim
Cara
Carrie
Emma
Debby
Emma
Tamara
I'm sure you will agree they've done a fabulous job this week !! 

I decided I'd do a little freebie for you all this week so with the 4th July holiday coming up for all my US friends, I thought it would be appropriate to make a template for you to scrap all those photos you plan on taking !! 

Download Link Removed


I would love to see the pages you create with this template - link me up on this post - you never know Kim may spotlight you on her next GSO feature. 
The download will be only be available until next Thursday before being released into my store on Friday so be quick and grab it now.

Hope you all have a fantastic weekend and a Happy 4th of July !!